Telescopes
|
Binoculars
Refractors
Reflectors
Catadioptrics
Solar
Mounts
Accessories
Magnification
"Where the telescope ends the microscope begins. Which of the two has the grander view?" ~ Victor Hugo
The first thing to learn is that magnification is not as important as some advertisements can make it seem. Neither is it meaningful to ask how far away you can see. What is important and meaningful are these things: How dim of a thing can I see (light-gathering)? How detailed is the image (resolution)? The answer to both of these questions is given by the size of the main optical element (the objective). In refractors the objective is a lens. In reflectors it is a mirror. Whichever design of scope you buy, the size and quality of the objective element is the most important consideration. All things being equal, bigger is better. So the real question should be, how big is the objective? Light Gathering The objective gathers and concentrates light. Generally speaking, the bigger the objective, the dimmer of an object you will be able to see, or put another way, objects will appear brighter with a bigger objective. Other factors affect the brightness, but no matter how clever the design, a telescope can utilize only the amount of light the objective gathers and delivers to the system. Bigger is better. Resolution Higher resolution means an image with more detail. Other factors affect resolution but the maximum resolving power is set by the diameter of the objective. Bigger is better. 2. Which type of telescope should I buy? Binoculars Before you buy a telescope, you should first consider binoculars. They are an important tool used by pretty much every amateur astronomer you will meet. Many objects are too large to fit in the highly magnified view of a telescope and thus are more appropriately viewed in binoculars. Very often astronomers use binoculars to "pre-locate" objects before attempting to aim their telescopes at them. This technique can greatly reduce the frustration of trying to locate difficult objects. There are other reasons to buy binoculars first. They can be used for many purposes, such as sports, birds, planes, and so forth. If you are considering a gift for a young astronomer, binoculars in the less-than $100 range are a great choice which will allow you to find out if Little Galileo is really dedicated to the hobby, before investing in an expensive telescope. The 7x50 design is the one most typically used by seasoned star-hoppers. Cheap Refractors There are so-called "dime store" or "department store" telescopes that have objective lenses in the 30 to 60 millimeter range. They are priced from $50 to $150. These instruments have some drawbacks that have drawn disdain from telescope enthusiasts; they are truly "toys." The optics tend to be of low quality. Some even have optics that are made of plastic instead of glass. The mounts are wobbly. The package includes eyepieces capable of producing magnification far in excess of what is useful and this meaningless theoretical magnification is sometimes shamelessly used as an advertising ploy. Experience shows that these telescopes often wind up in a closet gathering dust, and eventually in a yard sale. Meanwhile the same price range will yield a reasonable pair of binoculars that will be valued for many years. High Quality Refractors  Refractors use lenses to gather and focus light. The large "objective" lens refracts the light because the density of glass is greater than the air around it. Refractors have several design advantages over other designs but some practical disadvantages as well. One good thing is that they are enclosed which restricts the amount of dust and moisture entering the interior of the tube. The optics rarely have to be collimated (adjusted) by the user. Unlike most reflectors they do not have the central obstruction of a secondary mirror, which means more light can enter the tube and also there is less interference of the diffraction patterns - a desirable thing. The image is higher contrast and better resolution. Refractors are considered ideal for planetary viewing. One of the drawbacks with refractors is that different colors refract at different angles, making it difficult to bring all the colors of an image to the same focus. In the simpler, cheaper models the stars can be focused for blue, giving a fuzzy red halo, or focused for red, giving a fuzzy blue halo. This problem is greatly mitigated in more expensive models by the addition of more complicated lens elements. Some amateurs grind and polish and figure their own refracting lenses, but success requires a lot of skill so this is much more rare than the amateur production of the reflecting mirrors used in other telescope designs. Unlike their dime-store counterparts, quality refractors tend to provide images that are as beautiful as the most demanding purist could ever require. Generally speaking, stars are concentrated into tiny pinpoints, as they should be, and the background sky is very black. Closely spaced double stars are more easily split. Planets reveal their surface details. The rule of "bigger is better" still applies and unfortunately "quality" refractors are expensive. They can easily run in the $500 to $2000 per inch range for the diameter of the objective lens. Owners of these instruments tend to be a select group in amateur astronomy clubs. Newtonian Reflectors 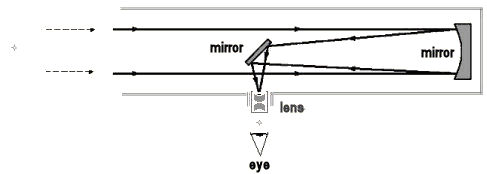
Reflectors gather and focus light by reflecting the light rays off of the surface of a curved mirror. Many of the reflectors in use today are Newtonians, so called because they are based on a design that was introduced by Isaac Newton. The primary mirror is a concave piece of glass with a coating of reflecting material like aluminum or silver. Light rays entering the open tube, reflect off the mirror at the bottom, back up to a second mirror held in the middle of the tube at an angle, and out through a hole in the side to the eyepiece. Since the light never passes through the glass, all the colors come to the same focus - an advantage over refractors. One problem with reflectors is that in order to make a reflector with a smaller f-ratio (less than F9), which gives a shorter tube, wider field of view, and brighter images, the curve of the mirror has to be in the shape of a parabola instead of the simpler sphere. "Fast mirrors" with spherical mirrors do not bring all of the light rays to the same focus. Creating a quality parabolized mirror solves this problem. It requires some skill but many people of all ages successfully grind, polish, and parabolize their own mirrors for constructing their own telescopes Telescopes that use mirrors are the mainstay of amateur astronomy. There are several companies that produce models with quality optics and competitive prices. Prices vary but typically you can expect to pay between $50 and $100 per inch of diameter of the objective mirror. Scopes of this type in the 8" to 12" range are very portable but are capable of giving spectacular views of a wide variety of objects; planets, the Moon, and the full catalog of Messier deep-sky objects. Catadioptrics / Cassegrains 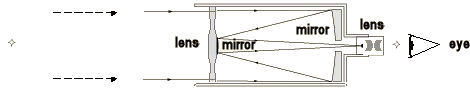
The cassegrain design is similar to the Newtonian described above but uses lenses as well as mirrors. Another difference is that instead of the secondary mirror reflecting the light at an angle out the side of the tube, it sends the light cone back down the tube and out through a hole drilled in the center of the large primary mirror. The advantage is that the viewer stands at the bottom of the tube assembly. With larger scopes this eliminates the need for a ladder. With some cassegrain designs the front of the tube is covered with a lens than compensates for the primary mirror being spherical instead of parabolized. This tactic can produce what is effectively a very long optical path in a very short package. It is convenient and stable but with the higher f-ratio needed for high magnification. Ratios of F10 are common. Schmidt-Cassegrain telescopes use a combination of lens and mirrored elements. They are very popular in the astronomy community. They offer maximum portability for their size. Their compactedness makes for a relatively stable platform for astrophotography. Many models now come "computerized" for ease of use. In the 8" diameter range you can expect to pay $2000 to $3000 for a complete package of scope and accessories. 3. Solar Scopes
There are also scopes that are designed specifically to be used only for viewing the sun. These dedicated solar scopes use a "hydrogen-alpha" filter which narrowly restricts the light to a wavelength of red light emitted by hydrogen (656.28 nm). Since the sun is mostly hydrogen, these filters do an excellent job of showing detailed solar activity such as flares, prominences, sunpots, and the overall granular structure of the solar suface. 4. What about the mount? 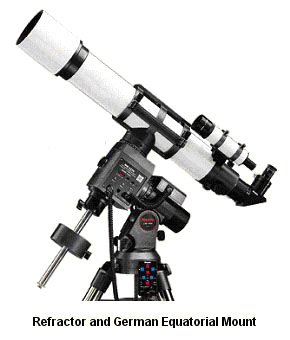 A telescope is just no fun without a stable, easy-to-use mount. You will appreciate a mount
that allows you to move the scope smoothly, instead of in a herky jerky motion. It is very
difficult to center an object in the field of view with a poor mount.
A telescope is just no fun without a stable, easy-to-use mount. You will appreciate a mount
that allows you to move the scope smoothly, instead of in a herky jerky motion. It is very
difficult to center an object in the field of view with a poor mount.
At the magnifications used in telescopes, the motion of the turning Earth quickly moves objects out of view from the eyepiece, especially objects near the celestial equator. Some telescope mounts are designed to compensate for this motion with an axis you can align with the north-south axis of the Earth. These "equatorial mounts" can utilize accessories such as "clock drives" that automatically move the scope at the appropriate rate. These techniques (and others) are very important for long exposure photography. Equatorial Mounts Most equatorial mounts in use by amateurs are one of two types: german equatorial mounts (gem's) and fork mounts. Each has their proponents and opponents but the overall popularity shows that both are very capable mounts. With the increased use of computers many astronomers have opted for a third option. Software and hardware is now available that allows the non-equatorial "altitude-azimuth" mounts to track and guide reliably. 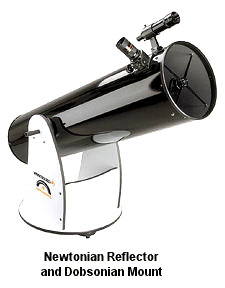 Alt-Az Mounts
On the other hand, fancy equatorial mounts and clock drives are not at all necessary for dedicated observing. Many amateur astronomers use simple altitude-azimuth type mounts. These mounts allow you to move the scope up and down in altitude, and around in a circle (azimuth). The difference between "alt-az" and equatorial can save you 100's or even 1000's of dollars. You can always upgrade the mount at some later point if you decide to try your hand at astrophotography. For your first scope, consider the stable and elegantly simple "Dobsonian" mount. Increasingly, amateurs are using software to control all types of telescope mounts automatically. These "go to" programs and databases are designed to interact with the mount to aim the telescope by the use of a remote control handset, or a laptop computer. There are other high-tech accessories available on the market such as GPS devices that help align a telescope with the north celestial pole based on your precise location, date, and time. 5. What accessories do I need? Eyepieces The most important accessory is the eyepiece. Remember, this is the last thing that happens to the light before it enters your eye. Just as excellent stereo speakers make an average audio system sound good, an excellent eyepiece will do wonders for your telescope. Spend the money for quality eyepieces. Eventually you will want to have at least three eyepieces; low power, medium power, and high power. Low power is used for initially locating difficult objects, and viewing very large objects. Medium power is what you will likely use most often; medium is your friend. High power is mostly used for planets on nights when the sky is very calm (good seeing). Since the medium power is so useful, buy it first. The low power piece is next to buy because locating objects is a skill that requires dedicated practice and the wide field of low power will be helpful. 
Eyepieces are divided according to their own individual focal lengths, as measured in millimeters. The higher the number, the lower the power (magnification) for a given telescope. Roughly speaking, low power eyepieces are in the 30 to 50 mm range, medium power are 20 to 25 mm range, and high power eyepieces are 9 to 12 mm. There are many brands and designs of eyepieces. The first division in design is the width of the eyepiece your telescope is designed to use. Many of the very cheap telescopes have a focuser that requires eyepieces that are only .96 inch wide. You probably won't find any quality eyepieces of this sort. Much better than these are the focusers that accept 1.25 inch diameter eyepieces. There are lots of quality eyepieces on the market of this sort. Many larger amateur scopes have focusers that accept 2 inch diameter pieces and have an adapter to accept 1.25 inch. The next division in eyepieces is the optical design. There are many designs and brands available. On the least expensive side, there are Kellners, Ramsdens, Erfles, and Orthoscopics; all reasonable choices for a beginner. For better quality a very good choice for the price is the Plossl design. They produce a relatively wide and flat field of view, and cost ranges from 30 to 100 dollars each, depending on focal length and brand. On the more expensive end of the spectrum, there are Nagler, Panoptic, Super Plossl, Super Wide Angle, Ultra Wide Angle, Standard Ultima, Wide Field Ultima, and more. These are all excellent designs and are popular with dedicated, demanding enthusiasts. Most of these will cost you 100 to several hundred dollars per eyepiece. Other Accessories If you bought a telescope bundled with accessories it probably came with something called a Barlow. It fits between the focuser and the eyepiece and it is designed to increase magnification by double or more. Use it with your most powerful eyepiece to see just how awful an image can be. Actually there are circumstances where it can be useful, like improving the ability of a short guide scope during long exposure photography. It can also be used with a low power eyepiece to make it high power, while retaining the longer eye relief (eyepiece-eyeball separation) of the low power eyepiece. This is handy if you wear glasses while viewing. A small "finder scope" mounted on top of the main scope is essential. This is used to aim the main scope at a target object. It usually has cross-hairs like a rifle scope. Finder scopes are very low power in order to provide a wide field of view. There are also aiming devices with no magnifying power at all. These "naked eye" finders are usually used in conjuction with powered finders.  Filters are available to enhance images. Most of them screw onto an eyepiece barrel. Some are designed
to increase the contrast for certain objects such as nebulae or planets.
There are polarizers which are nice for the Moon. There are also full-aperture solar filters which cover
the entire front end of the scope and allow you to safely view the Sun. Remember to remove or
cover up your finder scope while aimed at the Sun or it may heat up and melt.
Prices for filters vary greatly; from just a few bucks to more than a hundred.
Filters are available to enhance images. Most of them screw onto an eyepiece barrel. Some are designed
to increase the contrast for certain objects such as nebulae or planets.
There are polarizers which are nice for the Moon. There are also full-aperture solar filters which cover
the entire front end of the scope and allow you to safely view the Sun. Remember to remove or
cover up your finder scope while aimed at the Sun or it may heat up and melt.
Prices for filters vary greatly; from just a few bucks to more than a hundred.
The telescope industry will never get tired of providing you with ways to spend money on the hobby. They will always provide your friends and family with suggestions for birthday and christmas gifts for you. The standard basic gear includes: A red light, to protect your dark adaption, very important! Star charts, they should include "deep sky" objects like the Messiers. Binoculars, 7x35 or 7x50, or even 8x50. A case for eyepieces and other gizmos. Notebooks and pencils. Warm clothing, perhaps including gloves without fingers. Thermos and mug for your favorite beverage. About Magnification Magnification is calculated as the focal length of the telescope divided by the focal length of the eyepiece. 2000mm telescope, 25mm eyepiece, yields 80x magnification (2000 / 25 = 80). A common mistake by beginners is to place too much significance on magnification. Any telescope can be used at ridiculously high magnification which results in extremely poor image quality. Far more important is a telescope's aperture (diameter) and focal ratio. Under ideal conditions the maximum useful magnification is about 50x per inch of aperture. Under realistic conditions, 20x to 30x per inch of aperture is the maximum that astronomers tend to find useful. The f-ratio is the focal length divided by the aperture, i.e. how "fast" the optics bring the light to focus. Shorter length (low f) is considered faster and results in wider fields of view for a given eyepiece. Longer (high f) is considered slower and produces a narrower view for the same eyepiece. Either way it's the quality of the viewing, not the magnification that matters. The aperture relates to both brightness and resolution. These two things are what telescopes are really about. The bigger the primary optics, the bigger piece of the light you are capturing with which to form an image. Other things being equal, bigger is better.
|


